
Photo Manipulation
Manipulating a WW2 Fighter Aircraft Photoshop Tutorial
Step 1
Create a new document with dimensions; 550x400px then copy the image below then paste it into your document and scale and move it until you're happy with it then change the blend mode of this layer to multiply.
Step 2
We are going to add some noise to the plane because at the moment it looks a bit too clean and unrealistic.Create a new layer above the plane then go Filter>Noise>Add Noise and use a value of 50% and check uniform and monochromatic.
Step 3
Set this layer to 40% opacity and change the blend mode to soft light then Alt+click between the noise layer and the plane in the layers panel to add a clipping mask.Step 4
Since this is an image of a model plane then the propellers are obviously not moving so we're going to make them move in Photoshop; to do this we first have to make a copy of the plane then extract the propeller. First hold Alt and drag the plane layer above the noise layer, this will duplicate the layer but not break the clipping mask. Now hide the original plane layer then select the new plane layer and add a layer mask by pressing the layer mask button in the bottom of the layers panel. Now select the brush tool and choose a hard round brush, change the foreground color to black and start painting around the propeller; the parts that you paint on will be hidden. GO round the propeller and change the size of the brush regularly to suit the part you are working on. Keep at it until you have something like this and don't worry about being accurate here it wont really matter as long you have the basic shape.
Step 5
Duplicate this layer then right click on the layer mask and select 'Apply Layer Mask'. Select the smudge tool and choose a brush with 0% hardness andd a size of about 60px then change the strength to 50%. None blade at a time, just drag from the blade anti-clockwise slightly a few times to give the smudged effect shown below.
Step 6
Repeat step 5 but this time drag out a bit further then change the opacity of this layer to 50%. ![6[4]](http://photoshoptutorials.ws/images/stories/6%5B4%5D_bf2401c0-a234-4b9a-82bb-e1f28a484584.jpg "6[4]")
Step 7
We're going to make make it look even more like its spinning as well as adding some smoke at the same time.Create a new layer then select the brush tool and with a 0% hardness brush with a diameter of about 10px draw two rough circles one in black and one in the same color as the tip of the blades. ![7[4]](http://photoshoptutorials.ws/images/stories/7%5B4%5D_97b6c3dc-776d-46f7-b7dd-30f6c0c96d60.jpg "7[4]")
Step 8
We now need to blur this so go Filter>Blur>Gaussian Blur and use a value of 20px and you should get something similar to this. ![8[4]](http://photoshoptutorials.ws/images/stories/8%5B4%5D_9a8be939-c021-494d-a79d-356fed52e18c.jpg "8[4]")
Step 9
We'll take a look at where we've got to so far, we've added the noise first to make it look a bit dirtier then we isolated the propeller and and smudged it to look like its moving. Isolating parts of an image is a really important technique to start using as you'll often need to edit parts of a stock image and it's often much easier to isolate the parts whether you want to blur the part, alter some colors or change the shape and size of it. Lastly we just used a quick and simple way to add some more motion by quickly drawing a circle then heavily blurring it. Now just turn the visibility of the original plane back on and you should have something looking like this.
Step 10
In the next few steps we will be adding some burn marks, flame and smoke so we need a really good stock image to use for this, The one I use all the time for this kind of thing can be found here. I've shown what it looks like below and you'll notice that it's perfect for this kind of thing; it has flames, burn marks, smoke and even bits of debris. First paste this image into your document and scale it down to roughly your document size.
Step 11
Basically now we're going to copy part of this image onto the side of the plane, the easiest way to do this is to first duplicate the layer with the van in it then hide the original van layer. Now either use the eraser tool or the lasso tool to remove all except the the front corner of the van with burn marks, just do this roughly then rotate and scale this layer and place it over the plane like so, I used a soft eraser brush just to remove the hard edges.
Step 12
Now click the layer mask button in the layers panel to add a mask to this layer. Now select the brush tool and choose a soft round brush then change the foreground color to black then in the main toolbar change the opacity to 20%. We want to get rid of most of the flames here so do this by brushing over them (make sure you are working on the mask not the layer). As well as brushing over the flames we also want to hide some parts that are a bit too harsh or generally don't look right.Step 13
You'll have noticed that some parts of this layer run over the wing or outside the plane, to fix this you have to change the brush to about 85% hardness and an opacity of 100% then brush over the wings and around the plane. Use the image below for reference.
Step 14
We're going to add in some smoke now so create a new layer then select the brush tool and choose a 50px round brush with 0% hardness and an opacity of 10%. With the foreground color set to black, brush some smoke onto this layer; the best way to do this is to click continually rather than dragging. Try and get something that resembles the image below.
Step 15
Now we're going to make it look like the tail is burning and we are going to do this in the same way as we did to put the burn marks on the plane. First duplicate the van layer again and drag the duplicated layer to the top of the layer stack then get rid of the parts you don't want. Then place this layer over the wing, it doesn't matter what part of the image you use as long is it looks like burning metal.
Step 16
Now add a layer mask then with a hard black brush at full opacity, hide the parts that go outside the wing so this layer should now be the same shape as the wing. Next change the blend mode to hard light, you can experiment with some other blend modes if you want here.Step 17
Now to actually add the flame, again we do this in the same way so duplicate the van layer, drag it to the top of the layer stack then find a good flame (I liked the one just above the tire) then hide some of the other parts and soften the edges. Now rotate and scale it to get the flame in the right position like so.
Step 18
Add a layer mask to this layer then with a soft brush at varying opacities hide all the parts except the flame and also brush away parts of the flame to shape it slightly. Lastly, with a hard round brush at full opacity, brush over the wing so the flame doesn't look like it comes in front of the wing. Make sure the edges of the flames aren't too hard or it will look unrealistic.
Step 19
I wanted add a flame coming from the propeller, this had to be less visible as I figured the propeller would probably dissipate the flame. You should be able to work out how to do this but I'll go over how I did it. First duplicate the flame layer then drag it above the propeller then go Edit>Transform>Warp and shape the flame a bit like so. Note that I've hidden the back flame in the images below just so you can see this flame more clearly.
Step 20
Add a layer mask and soften this flame a lot by brushing over it with a soft black brush at a medium opacity until you get something similar to the image below.
Step 21
That's as far as I'm going to take you but there's a lot further you can go, a few ideas to try would be to make it look like one of the blades are on fire or to add some falling debris or even break one of the wings.
Step 22
The last thing I did was to add a simple background this can be any image of a sky, however the image has to be fairly light because we have the plane layer set at overlay, this was so we didn't need to remove the white background from it but it does limit us to placing the plane over a light background. If you want to use this on a darker background then you would have to extract the plane which isn't all that hard as it is on a white background anyway. Hopefully you learned some skills that you can transfer to other projects and have fun setting things on fire and generally destroying stuff.
Photo Manipulation
![22[8]](http://photoshoptutorials.ws/images/stories/22%5B8%5D_bea4ad69-801e-4eda-a6c1-4fd376bcb069.jpg "22[8]")
Manipulating a WW2 Fighter Aircraft Photoshop Tutorial
Step 1
Create a new document with dimensions; 550x400px then copy the image below then paste it into your document and scale and move it until you're happy with it then change the blend mode of this layer to multiply.
![1[4]](http://photoshoptutorials.ws/images/stories/1%5B4%5D_3a1efa85-8a0e-43cd-8bbe-f227ab944a07.jpg "1[4]")
Step 2
We are going to add some noise to the plane because at the moment it looks a bit too clean and unrealistic.Create a new layer above the plane then go Filter>Noise>Add Noise and use a value of 50% and check uniform and monochromatic.
![2[4]](http://photoshoptutorials.ws/images/stories/2%5B4%5D_8b5da581-bf8b-400b-a0eb-85db42768559.jpg "2[4]")
Step 3
Set this layer to 40% opacity and change the blend mode to soft light then Alt+click between the noise layer and the plane in the layers panel to add a clipping mask.
![3[4]](http://photoshoptutorials.ws/images/stories/3%5B4%5D_c5dcc60b-c137-414a-ab4d-f65b2d22919d.jpg "3[4]")
Step 4
Since this is an image of a model plane then the propellers are obviously not moving so we're going to make them move in Photoshop; to do this we first have to make a copy of the plane then extract the propeller. First hold Alt and drag the plane layer above the noise layer, this will duplicate the layer but not break the clipping mask. Now hide the original plane layer then select the new plane layer and add a layer mask by pressing the layer mask button in the bottom of the layers panel. Now select the brush tool and choose a hard round brush, change the foreground color to black and start painting around the propeller; the parts that you paint on will be hidden. GO round the propeller and change the size of the brush regularly to suit the part you are working on. Keep at it until you have something like this and don't worry about being accurate here it wont really matter as long you have the basic shape.
![4[4]](http://photoshoptutorials.ws/images/stories/4%5B4%5D_35a714ba-fa8e-44f4-891e-de51aeb1c0c6.jpg "4[4]")
Step 5
Duplicate this layer then right click on the layer mask and select 'Apply Layer Mask'. Select the smudge tool and choose a brush with 0% hardness andd a size of about 60px then change the strength to 50%. None blade at a time, just drag from the blade anti-clockwise slightly a few times to give the smudged effect shown below.
![5[4]](http://photoshoptutorials.ws/images/stories/5%5B4%5D_b5e2e521-4d6a-4254-88c5-7a43b974a663.jpg "5[4]")
Step 6
Repeat step 5 but this time drag out a bit further then change the opacity of this layer to 50%.
Step 7
We're going to make make it look even more like its spinning as well as adding some smoke at the same time.Create a new layer then select the brush tool and with a 0% hardness brush with a diameter of about 10px draw two rough circles one in black and one in the same color as the tip of the blades.
Step 8
We now need to blur this so go Filter>Blur>Gaussian Blur and use a value of 20px and you should get something similar to this.
Step 9
We'll take a look at where we've got to so far, we've added the noise first to make it look a bit dirtier then we isolated the propeller and and smudged it to look like its moving. Isolating parts of an image is a really important technique to start using as you'll often need to edit parts of a stock image and it's often much easier to isolate the parts whether you want to blur the part, alter some colors or change the shape and size of it. Lastly we just used a quick and simple way to add some more motion by quickly drawing a circle then heavily blurring it. Now just turn the visibility of the original plane back on and you should have something looking like this.
![9[4]](http://photoshoptutorials.ws/images/stories/9%5B4%5D_3c476c33-260d-4a1a-9583-17212dae4208.jpg "9[4]")
Step 10
In the next few steps we will be adding some burn marks, flame and smoke so we need a really good stock image to use for this, The one I use all the time for this kind of thing can be found here. I've shown what it looks like below and you'll notice that it's perfect for this kind of thing; it has flames, burn marks, smoke and even bits of debris. First paste this image into your document and scale it down to roughly your document size.
![10[4]](http://photoshoptutorials.ws/images/stories/10%5B4%5D_084607fb-aebd-46a5-91b2-9fb1c546e897.jpg "10[4]")
Step 11
Basically now we're going to copy part of this image onto the side of the plane, the easiest way to do this is to first duplicate the layer with the van in it then hide the original van layer. Now either use the eraser tool or the lasso tool to remove all except the the front corner of the van with burn marks, just do this roughly then rotate and scale this layer and place it over the plane like so, I used a soft eraser brush just to remove the hard edges.
![11[4]](http://photoshoptutorials.ws/images/stories/11%5B4%5D_80e07feb-9d60-47b8-b1e6-469e75708fa4.jpg "11[4]")
Step 12
Now click the layer mask button in the layers panel to add a mask to this layer. Now select the brush tool and choose a soft round brush then change the foreground color to black then in the main toolbar change the opacity to 20%. We want to get rid of most of the flames here so do this by brushing over them (make sure you are working on the mask not the layer). As well as brushing over the flames we also want to hide some parts that are a bit too harsh or generally don't look right.
![12[4]](http://photoshoptutorials.ws/images/stories/12%5B4%5D_c5f3fbf8-8832-4a98-9982-ff386c624400.jpg "12[4]")
Step 13
You'll have noticed that some parts of this layer run over the wing or outside the plane, to fix this you have to change the brush to about 85% hardness and an opacity of 100% then brush over the wings and around the plane. Use the image below for reference.
![13[4]](http://photoshoptutorials.ws/images/stories/13%5B4%5D_efc2d2c3-1300-493e-9d6f-61086733b95f.jpg "13[4]")
Step 14
We're going to add in some smoke now so create a new layer then select the brush tool and choose a 50px round brush with 0% hardness and an opacity of 10%. With the foreground color set to black, brush some smoke onto this layer; the best way to do this is to click continually rather than dragging. Try and get something that resembles the image below.
![14[4]](http://photoshoptutorials.ws/images/stories/14%5B4%5D_8b3c79d2-a3a2-4cf9-bcbe-dfd258446a19.jpg "14[4]")
Step 15
Now we're going to make it look like the tail is burning and we are going to do this in the same way as we did to put the burn marks on the plane. First duplicate the van layer again and drag the duplicated layer to the top of the layer stack then get rid of the parts you don't want. Then place this layer over the wing, it doesn't matter what part of the image you use as long is it looks like burning metal.
![15[4]](http://photoshoptutorials.ws/images/stories/15%5B4%5D_c96799df-d35c-4a69-b7c9-3234c9fe6f44.jpg "15[4]")
Step 16
Now add a layer mask then with a hard black brush at full opacity, hide the parts that go outside the wing so this layer should now be the same shape as the wing. Next change the blend mode to hard light, you can experiment with some other blend modes if you want here.
![16[4]](http://photoshoptutorials.ws/images/stories/16%5B4%5D_8e2d36a2-2b2a-450d-be9e-3c4f3bd4ba31.jpg "16[4]")
Step 17
Now to actually add the flame, again we do this in the same way so duplicate the van layer, drag it to the top of the layer stack then find a good flame (I liked the one just above the tire) then hide some of the other parts and soften the edges. Now rotate and scale it to get the flame in the right position like so.
![17[4]](http://photoshoptutorials.ws/images/stories/17%5B4%5D_d46a93a3-98fc-482c-a061-3b0ab1bc7b97.jpg "17[4]")
Step 18
Add a layer mask to this layer then with a soft brush at varying opacities hide all the parts except the flame and also brush away parts of the flame to shape it slightly. Lastly, with a hard round brush at full opacity, brush over the wing so the flame doesn't look like it comes in front of the wing. Make sure the edges of the flames aren't too hard or it will look unrealistic.
![18[4]](http://photoshoptutorials.ws/images/stories/18%5B4%5D_f43492d4-66f4-452b-a5e2-aa5044d644e8.jpg "18[4]")
Step 19
I wanted add a flame coming from the propeller, this had to be less visible as I figured the propeller would probably dissipate the flame. You should be able to work out how to do this but I'll go over how I did it. First duplicate the flame layer then drag it above the propeller then go Edit>Transform>Warp and shape the flame a bit like so. Note that I've hidden the back flame in the images below just so you can see this flame more clearly.
![19[4]](http://photoshoptutorials.ws/images/stories/19%5B4%5D_015c05e0-6be7-4913-b209-6523912a5545.jpg "19[4]")
Step 20
Add a layer mask and soften this flame a lot by brushing over it with a soft black brush at a medium opacity until you get something similar to the image below.
![20[4]](http://photoshoptutorials.ws/images/stories/20%5B4%5D_73442237-cc45-4a91-b678-38087c374255.jpg "20[4]")
Step 21
That's as far as I'm going to take you but there's a lot further you can go, a few ideas to try would be to make it look like one of the blades are on fire or to add some falling debris or even break one of the wings.
![21[4]](http://photoshoptutorials.ws/images/stories/21%5B4%5D_c53bc5b9-2f42-4e3e-86c7-abf068f5976a.jpg "21[4]")
Step 22
The last thing I did was to add a simple background this can be any image of a sky, however the image has to be fairly light because we have the plane layer set at overlay, this was so we didn't need to remove the white background from it but it does limit us to placing the plane over a light background. If you want to use this on a darker background then you would have to extract the plane which isn't all that hard as it is on a white background anyway. Hopefully you learned some skills that you can transfer to other projects and have fun setting things on fire and generally destroying stuff.
![22[9]](http://photoshoptutorials.ws/images/stories/22%5B9%5D_eb6d6fba-95e3-4ff3-a6cc-11cf09dc3bc3.jpg "22[9]")


Recreate this image in Photoshop by Friday

I have included the source images below. You can use my background or your own.
Due Friday at the beginning of class.


A Basic Guide To Photoshop Filters


-------------------------------------------------------------------------------------------------------------------------
Why do we need selections in Photoshop?
There's no shortage of ways to select things in an image with Photoshop. We can make simple geometric selections with the Rectangular Marquee Tool or the Elliptical Marquee Tool, or freehand selections with theLasso, Polygonal Lasso or Magnetic Lasso Tools. We can select areas of similar color or brightness values with the Magic Wandor Color Range command. We can paint or refine a selection manually with a brush in Quick Mask mode or by using a layer mask. We can make surgically-precise selections with the Pen Tool, and more! We can even combine different selection methods when none of them by themselves seem to be up to the challenge.
None of this, however, explains why we need to make selections in the first place, so in this tutorial, we'll take a quick look at the "why". This won't be a detailed explanation of how to make selections. We'll save that for other tutorials. Here, we're simply going to look at why we need to make selections at all.
Do You See What I See?
As I write this, summer is once again coming to an end. The days are getting shorter, the nights are cooler, and around here, with autumn fast approaching, the weekend farmers markets will soon be filled with bushels and bushels of apples. In fact, here's some right now just waiting to be picked:

Red, delicious apples. Unless of course, you don't like apples, but who doesn't like apples?
Obviously, the main subject in the photo above is the apples, right? But why is it obvious? How do we know that we're looking at apples? We know because most of us have seen enough apples in the past that we can instantly recognize them. We know their shape, their color and their texture because we've seen them before. We could even point to each apple in the photo if someone asked us to without mistakenly pointing at a leaf or something else that isn't an apple because we have no problem distinguishing between all the different objects in the image. We see things with our eyes and our brain tells us that this is this and that is that, and this is not that and that is not this. In fact, even if we had never seen an apple before, we could at least point to all the objects that look relatively the same. We're so good at recognizing and identifying objects that we usually do it without consciously thinking about it.
That's great for us, but what about Photoshop? Does Photoshop see the apples? Does Photoshop recognize their shape, color and texture as "apple"? Can it point to all the apples in the photo without confusing an apple with a leaf, or at least point to all the objects that look the same?
The simple answer is no, it can't. No matter how many photos of apples you've opened in Photoshop in the past (geez, what is it with you and apples?), Photoshop has no idea what apples are or what they look like. The reason is because all Photoshop sees ispixels. It doesn't matter if it's a photo of apples, oranges or monkeys eating bananas. To Photoshop, it's all the same. It's all just pixels, those tiny little squares that make up a digital photo:
A close-up view of the edge of an apple showing that it's really just a bunch of tiny square pixels.
What this unfortunately means for us is that we can't simply click on something in a photo and expect Photoshop to instantly select it for us because what we see as separate and independent objects, Photoshop sees as nothing but different colored pixels. So how do we get around this little problem of miscommunication? Well, since we can't expect Photoshop to think like us, we need to think like Photoshop. We need a way to tell Photoshop that we want to work on these pixels here but not those pixels there. We can't tell Photoshop that we want to change the color of the apple, for example, but we can tell it that we want to change the color of the pixels that, to us, make up that apple. We do that by first selecting those pixels in the photo, and we do that by making... you guessed it... selections!
Select None To Select Them All
So far, we know that we see things very differently from how Photoshop sees them. We see independent, recognizable objects while Photoshop sees everything as pixels, and we tell Photoshop which pixels we want to work on by selecting them with one or more of the various selection tools. In fact, before we can do anything at all to an image, Photoshop first needs to know which pixels we want to edit.
For example, let's say I want to change the color of the main apple in the photo. I want to change it from red to green. Based on what I just said, I shouldn't be able to do that without first selecting the pixels that make up the apple. Let's give it a try anyway, just for fun. I'll select the Brush Tool from the Tools panel:

Selecting the Brush Tool.
Then I'll select a green color to paint with by clicking on the Foreground color swatch near the bottom of the Tools panel:

Photoshop paints with the current Foreground color.
Clicking on the color swatch brings up Photoshop's Color Picker. I'll select a light green:

The Color Picker is the most common way to select colors in Photoshop.
I'll click OK to exit out of the Color Picker, and now that I have my Brush Tool selected and green as my Foreground color, I'll try to paint over the apple. Since I didn't bother to select any pixels before painting, we already know that I'm wasting my time (and yours) here. Photoshop isn't going to let me do anything. In fact, as soon as I try to paint over the apple, it throws a big warning box at me threatening to crash my hard drive if I ever try to get away with this again:

Ultra-realistic photo effect. Expert users only.
Wait a minute, what just happened?! I was able to paint over the apple! Photoshop didn't complain at all! Okay, let's recap. I said we can't do anything to an image unless we first select the pixels that we want to edit. Then to prove it, I grabbed my Brush Tool and tried painting over part of the image without first selecting anything, yet I was still able to paint over it. This can only mean one thing... I have no idea what I'm talking about!
Seriously though, the real reason why I was still able to paint over the apple without first selecting any pixels is because of a little known fact. Whenever we have nothing selected in an image, we actually have everything selected. Photoshop assumes that if we didn't select any specific pixels first, it can only be because we wanted every pixel selected so we can edit the entire photo. Or at least, we have the option to edit the entire photo. As we saw in this example, I was able to paint over just a small area of the image even though I didn't select any pixels first, but if I wanted to, I could have just as easily painted over the entire image and there would have been nothing preventing me from doing that.
While having the freedom to go where we want and do what we please sounds wonderful, it can actually be a very bad thing, at least when it comes to photo editing. In this example, all I wanted to do was change the color of the apple, yet because I didn't select the apple first, Photoshop allowed me to paint anywhere I wanted, and all I ended up doing was making a mess of things. Let's see what happens if I select the apple first.
Painting Inside The Lines
I'm going to undo the paint strokes I added to the image by pressing Ctrl+Z (Win) / Command+Z (Mac), and this time, I'll select the apple first before painting over it. As I mentioned at the beginning of this tutorial, we'll save the details of how to actually make selections for other tutorials. For now, I'll simply go ahead and draw a selection around the apple. Photoshop displays selection outlines for us as a series of animated dashed lines, or what many people call "marching ants". Obviously, we can't see them "marching" in the screenshot, but we can at least see the selection outline that now appears around the apple:

Selection outlines appear as animated "marching ants".
Of course, to us, it looks like I've selected the apple, but keep in mind that as far as Photoshop is concerned, all I've done is selected some of the pixels in the image. They just happen to be the pixels that make up what you and I see as an apple. The pixels that fall within the boundaries of the selection outline are now selected, which means that they can be affected by whatever edits I make next, while the remaining pixels outside of the selection outline are not selected and won't be affected by anything I do.
Let's see what happens now when I try painting over the apple again. I'll grab the Brush Tool just like I did before, and with green still as my Foreground color, I'll try painting over the apple. The only difference this time is that I selected the apple first:

The paint strokes now appear only inside the selected area.
Thanks to the selection I made before painting, Photoshop allowed me to paint only inside my selected area. Even though I moved the brush well outside the boundaries of the selection as I was painting and made no attempt to stay inside the lines, none of the pixels outside of the selection outline were affected. They remained safe and unharmed no matter how sloppy I was with the brush, and I was able to easily paint over the apple without worrying about the rest of the image, all thanks to my selection!
Of course, just because we've selected a certain area of pixels doesn't mean we necessarily have to edit every pixel inside the selection outline. I'm going to once again remove my green paint strokes by pressing Ctrl+Z (Win) / Command+Z (Mac) to undo the last step, and this time, with my selection still active, I'm going to use a much larger brush with soft edges to paint only along the bottom half of the apple, giving me a nice transition in the middle between the green brush color and the natural red of the apple. Even though the pixels in the top half of the apple are part of the selection I made, they remain unchanged because I chose not to paint over them. Photoshop doesn't actually care if we do anything with the pixels we've selected. All it cares about is that we don't get to touch the pixels we didn't select:

Any pixel inside of a selection outline can be edited, but nothing says you have to edit every pixel.
Just as before, my paint stroke is confined to the pixels inside of the selection outline, even though I moved well outside of it with my brush. To make things look a bit more realistic, I'm going to blend the green color in with the apple using one of Photoshop's blend modes. I'll go up to the Edit menu at the top of the screen and choose the Fade Brush Tool option:

The actual name of the Fade option changes depending on the last edit that was made.
This brings up Photoshop's Fade dialog box, which allows us to make some adjustments to the previous edit. To blend the green in with the apple, I'm going to change the blend mode of the brush to Color, and to lower the intensity of the green, I'll lower theOpacity option down to around 80%:

The Color blend mode allows us to change the color of an object without changing its original brightness values.
I'll click OK to exit out of the Fade dialog box, and to temporarily hide the selection outline around the apple so we can more easily judge the results, I'll press Ctrl+H (Win) / Command+H (Mac). Thanks to the adjustments I made with the Fade command, we now have an apple that could still use a bit more time on the tree before picking:

Press Ctrl+H (Win) / Command+H (Mac) to temporarily hide selection outlines. Press it again to bring them back.
Up next, we'll look at another important reason for making selections - working with layers!
Selections Make Layers More Useful
Up until now, I've been making all of my edits directly on the Background layer, which is a very bad way to work because it means that I've been making changes to my original photo. If I was to save my changes and close out of the document window, the original image would be lost forever. Sometimes that may be fine, but it tends to leave a bad impression when you're forced to call up a client and ask, "Would you happen to have another copy of the photo you sent over? I sort of... well, hehe... I kind of ruined the copy you gave me".
A much better way to work in Photoshop is to use layers. With layers, we can work on a copy of the image while leaving the original unharmed, and thanks to selections, we can even copy different parts of an image to their own layers so we can work on them independently! Without the ability to make selections though, layers in Photoshop would be nowhere near as useful as they are.
I'm going to revert my image back to its original, unedited state by going up to the File menu and choosing Revert. This sets my image back to the way it was when I first opened it:

The Revert command reverts an image back to its original state or to the last saved state.
A very common Photoshop effect is to leave something in the image in full color while converting the rest of the photo to black and white. Let's see how selections can help us to do this. First, since we just said that working directly on the Background layer is a bad thing, let's duplicate the Background layer, which will give us a copy of it that we can work on. To do that, I'll go up to the Layermenu at the top of the screen, then I'll choose New, and then I'll choose Layer via Copy:

Creating a copy of the original image.
If we look in the Layers panel, we can see that we now have two layers - the Background layer on the bottom which holds the original photo, and a new layer above it which Photoshop has named "Layer 1", containing a copy of the photo that we can safely edit without harming the original:

Working on a copy of the image keeps the original safe.
Notice that the entire Background layer was copied. We'll come back to this in a moment. Since we want to leave the apple with its original colors while converting everything else to black and white, we'll need to select the apple before we do anything else, so I'll once again draw a selection around it. Our familiar selection outline reappears:

A selection outline appears once again around the apple.
With the apple selected, I'm going to create another copy of the image by going back up to the Layer menu, choosing New and then choosing Layer via Copy. Remember that the last time we did this, Photoshop copied the entire layer. This time though, something different has happened. We now have a third layer in the Layers panel sitting above "Layer 1" and the Background layer, but if we look in the preview thumbnail to the left of the new layer's name, we can see that all we copied this time was the apple itself, not the entire layer:

True to its name, the preview thumbnail gives us a preview of the contents of each layer.
Any time we have a selection active when we copy a layer, only the area inside the selection outline is copied, which is why in this case, only the apple was copied. This ability to isolate a specific object in a photo and place it on its own layer is what makes layers so incredibly useful. If we couldn't select anything first, all we could do is make copy after copy of the entire image, which is usually about as pointless as it sounds.
Now that my apple is sitting all by itself above the other layers, I'm going to click on "Layer 1" in the Layers panel to select it. Selected layers appear highlighted in blue in the Layers panel, and now anything I do next will be applied to the copy of the original image on "Layer 1", leaving the apple on the top layer untouched:

Selected layers appear highlighted in blue.
To convert the image to black and white, I'll quickly desaturate it by going up to the Image menu, choosing Adjustments and then choosing Desaturate:

The Desaturate command is a quick way to remove color from an image.
Desaturating an image is certainly not the best way to convert a color photo to black and white, but it works in a hurry. Let's look again in the Layers panel, where we can see in the preview thumbnail for "Layer 1" that the copy of our original image now appears in black and white, while the apple on the layer above it has been unaffected and remains in color:

Only "Layer 1" has been desaturated.
Since the apple is sitting on a layer above the black and white version of the image, it appears in full color in front of the black and white image in the document window:

Combining selections with layers makes a great creative team.
Of course, there's a lot more we can do with selections in Photoshop than just painting inside of them or copying them to new layers, but hopefully this gave us an idea of why selections are so important. Photoshop sees only pixels where we see independent objects, so we need selections as a way to bridge the gap between our world and Photoshop's world. And while layers can stake their claim as one of the biggest and best features of Photoshop, they owe more of their usefulness to selections than they'd probably care to admit.
Now that we have some idea of why we need selections, how do we actually make them? We'll look at that next, beginning with one of the most commonly used selection tools in Photoshop, the Rectangular Marquee Tool!
------------------------------------------------------------------------------------------------------------------------
The Lasso Tool
Photoshop actually gives us three variations of lasso to work with. The one we'll be looking at in this tutorial is the standard Lasso Tool, which you can access by clicking on its icon in the Tools panel. It's the tool that looks like the sort of lasso you'd find a cowboy swinging at a rodeo:

Selecting the standard Lasso Tool.
For a faster way to select the Lasso Tool, simply press the letter L on your keyboard. There are two other types of lasso tools as well - the Polygonal Lasso Tool and the Magnetic Lasso Tool, both of which are hiding behind the standard Lasso Tool in the Tools panel. We'll look at both of these tools in separate tutorials, but to access either of them, simply click and hold your mouse button down on the standard Lasso Tool until a small fly-out menu appears, then select either tool from the menu:

Each of the three types of lasso tool gives us a different way to draw selections.
All three lasso tools share the letter L as their keyboard shortcut for selecting them, so depending on how you have things set up in Photoshop's Preferences, you can cycle through the three tools either by pressing the letter L repeatedly or by pressing Shift+L. We covered how to change the option in the Preferences for switching between tools in the Elliptical Marquee Tool tutorial.
Drawing Freehand Selections
Of all the selection tools in Photoshop, the Lasso Tool is probably the easiest to use and understand because you simply drag a freehand selection around the object or area you want to select, in a similar way to how you would outline something on a piece of paper with a pen or pencil. With the Lasso Tool selected, your mouse cursor will appear as a small lasso icon, and you simply click at the spot in the document where you want to begin the selection, then continue holding your mouse button down and drag to draw a freeform selection outline:

Drawing a selection outline with the Lasso Tool is like drawing with a pen or pencil on paper.
To complete the selection, simply return to the spot where you began and release your mouse button. You don't necessarily have to return the same spot you started from, but if you don't, Photoshop will automatically close the selection for you by drawing a straight line from the point where you released your mouse button to the point where you began, so in most cases, you will want to finish where you started:

Photoshop will close a selection automatically with a straight line if you don't drag back to the beginning point.
To say that the Lasso Tool is not the most accurate of Photoshop's selection tools would be an understatement, but its usefulness is greatly improved with Photoshop's ability to add to and subtract from selections. I find that the best way to work with the Lasso Tool is to drag an initial selection around the object or area I'm selecting, ignoring any obvious mistakes I made, then going back around and fixing up the problem areas by adding to or subtracting from the selection as needed.
Here's a photo I currently have open on my screen of two people shaking hands. I want to select the handshake and place it into a different image:

The Lasso Tool is a good choice for selecting freeform objects like this.
To begin my selection, I'll first grab the Lasso Tool from the Tools panel as we saw earlier. Then I'll click somewhere along the top of the sleeve of the person on the left to begin my selection, although it really makes no difference where along the object you begin your selection with the Lasso Tool. Once I've clicked on a starting point, I'll continue holding my mouse button down as I drag to draw an outline around the area of the photo I need. I can already see that I've made some mistakes, but I'll ignore them for now and continue on:

Don't worry about any mistakes with your initial selection. You can fix them later.
If you need to scroll your image around inside the document window as you're drawing the selection, hold down your spacebar, which will temporarily switch you to Photoshop's Hand Tool, scroll the image as needed, then release your spacebar and continue drawing the selection.
To make sure I select all of the pixels I need along the edge of the photo, I'll press the letter F on my keyboard to switch to Full Screen Mode with Menu Bar and I'll drag my selection outline into the gray pasteboard area surrounding the image. Don't worry about selecting the pasteboard, since Photoshop only cares about the image itself, not the pasteboard area:

It's okay to drag the Lasso Tool into the pasteboard area when you need to select pixels along the edge of a photo.
If you want to switch back to the document window view mode, press the letter F a couple more times to cycle through Photoshop's screen modes. I'll continue dragging around the area I need to select until I'm back to my starting point, and to complete my initial selection with the Lasso Tool, I'll simply release my mouse button. An animated outline, commonly known as "marching ants", now appears around the selected area:

The initial selection is complete, but there's quite a few problem areas that need fixing.
Since the Lasso Tool is essentially a manual selection tool that relies heavily on your own drawing skills, as well as on the accuracy and performance of your mouse, you'll probably end up with an initial selection outline that falls well short of perfect, as mine did. Not to worry though, since we can easily go back and fix up the problem areas, which we'll do next!
Adding To The Initial Selection
To inspect the selection outline for any problem areas, it usually helps to be zoomed in on the image. To zoom in, press and holdCtrl+spacebar (Win) / Command+spacebar (Mac) to temporarily switch to Photoshop's Zoom Tool, then click inside the document window once or twice to zoom in (to zoom back out later, press and hold Alt+spacebar (Win) / Option-spacebar (Mac) and click inside the document window). Once you've zoomed in, hold down your spacebar by itself to temporarily switch to the Hand Tool, then click and drag the image along the selection outline to look for problems.
Here, I've come across an area where I missed the edge of the person's hand:

One of several problem areas with the initial selection.
No need to start all over again. I can easily fix this by simply adding to the existing selection. Make sure you still have the LassoTool selected, then to add to a selection, hold down your Shift key. You'll see a small plus sign (+) appear in the bottom right of the cursor icon, letting you know that you're now in Add to Selection mode. With the Shift key held down, click somewhere inside of the existing selection, then drag outside of it and along the edge of the area you want to add. When you're done adding the new area, drag back inside of the existing selection:

Hold down your Shift key and drag around the area you want to add to the existing selection.
Drag back to the spot where you initially clicked, then release your mouse button to finish. The area of the person's hand that I missed initially has now been added:

More of the image has been added to the initial selection.
There's no need to continue holding down your Shift key the whole time you're adding to a selection. Once you've started dragging your mouse, you can safely release the Shift key. You'll stay in Add to Selection mode until you release your mouse button.
Subtracting From The Initial Selection
I'll continue scrolling along my selection outline looking for problems, and here I've come across the exact opposite problem from what I had a moment ago. This time, I selected too much of the image around the person's finger:

Another sloppy selection area. This time, too much of the area was selected.
No worries though, since we can remove parts of a selection just as easily as we can add to them. To remove an unwanted area from a selection, hold down your Alt (Win) / Option (Mac) key. This will place you in Subtract from Selection mode, and you'll see a small minus sign (-) appear in the bottom right corner of the cursor icon. With the Alt / Option key held down, simply click anywhere outside of the existing selection to set a starting point, then drag inside the selection and along the edge of the area you want to remove. In my case, I'm going to drag along the edge of the finger. When you're done, drag back outside of the existing selection:

Removing the problem area by subtracting it from the selection.
Drag back to the spot where you first clicked, then release your mouse button to finish. The unwanted area around the person's finger has now been removed:

Problem area? What problem area? I don't see any problem area.
Again, there's no need to hold your Alt / Option key down the entire time. You can safely release the key once you've started dragging. You'll remain in Subtract from Selection mode until you release your mouse button.
Once I've scrolled all around the selection outline fixing problems by adding or removing parts as needed, my final selection with the Lasso Tool is complete:

The final selection.
With the handshake now selected, I'll press Ctrl+C (Win) / Command+C (Mac) to quickly copy the selected area, then I'll open up a second image in Photoshop and press Ctrl+V (Win) / Command+V (Mac) to paste the handshake into the new photo, repositioning it as needed:

Thanks to our successful Lasso Tool selection, business is booming!
Removing A Selection
When you're done with a selection created with the Lasso Tool, you can remove it by going up to the Select menu at the top of the screen and choosing Deselect, or you can press the keyboard shortcut Ctrl+D (Win) / Command+D (Mac). You can also simply click anywhere inside of the document with the Lasso Tool.
As we've seen, Photoshop's Lasso Tool is an incredibly easy tool to use, and while it may not qualify as a professional-level selection tool, the ability to go back and fix problems with the initial selection can really help to improve your results. Up next, we'll look at the second of the three lasso tools, the Polygonal Lasso Tool!
Loading an Image
Link to image:http://www.personal.psu.edu/sdo5020/orca.png

------------------------------------------------------------------------------------------------------------------------
TURNING DAY INTO NIGHT


------------------------------------------------------------------------------------------------------------------------
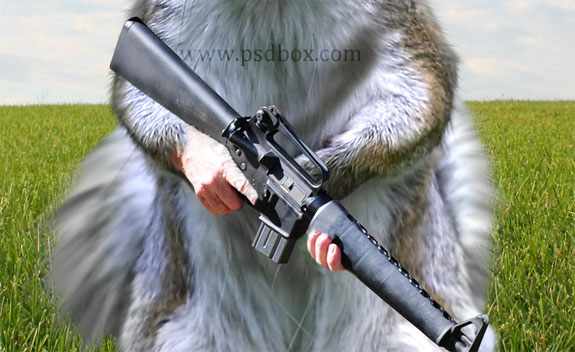
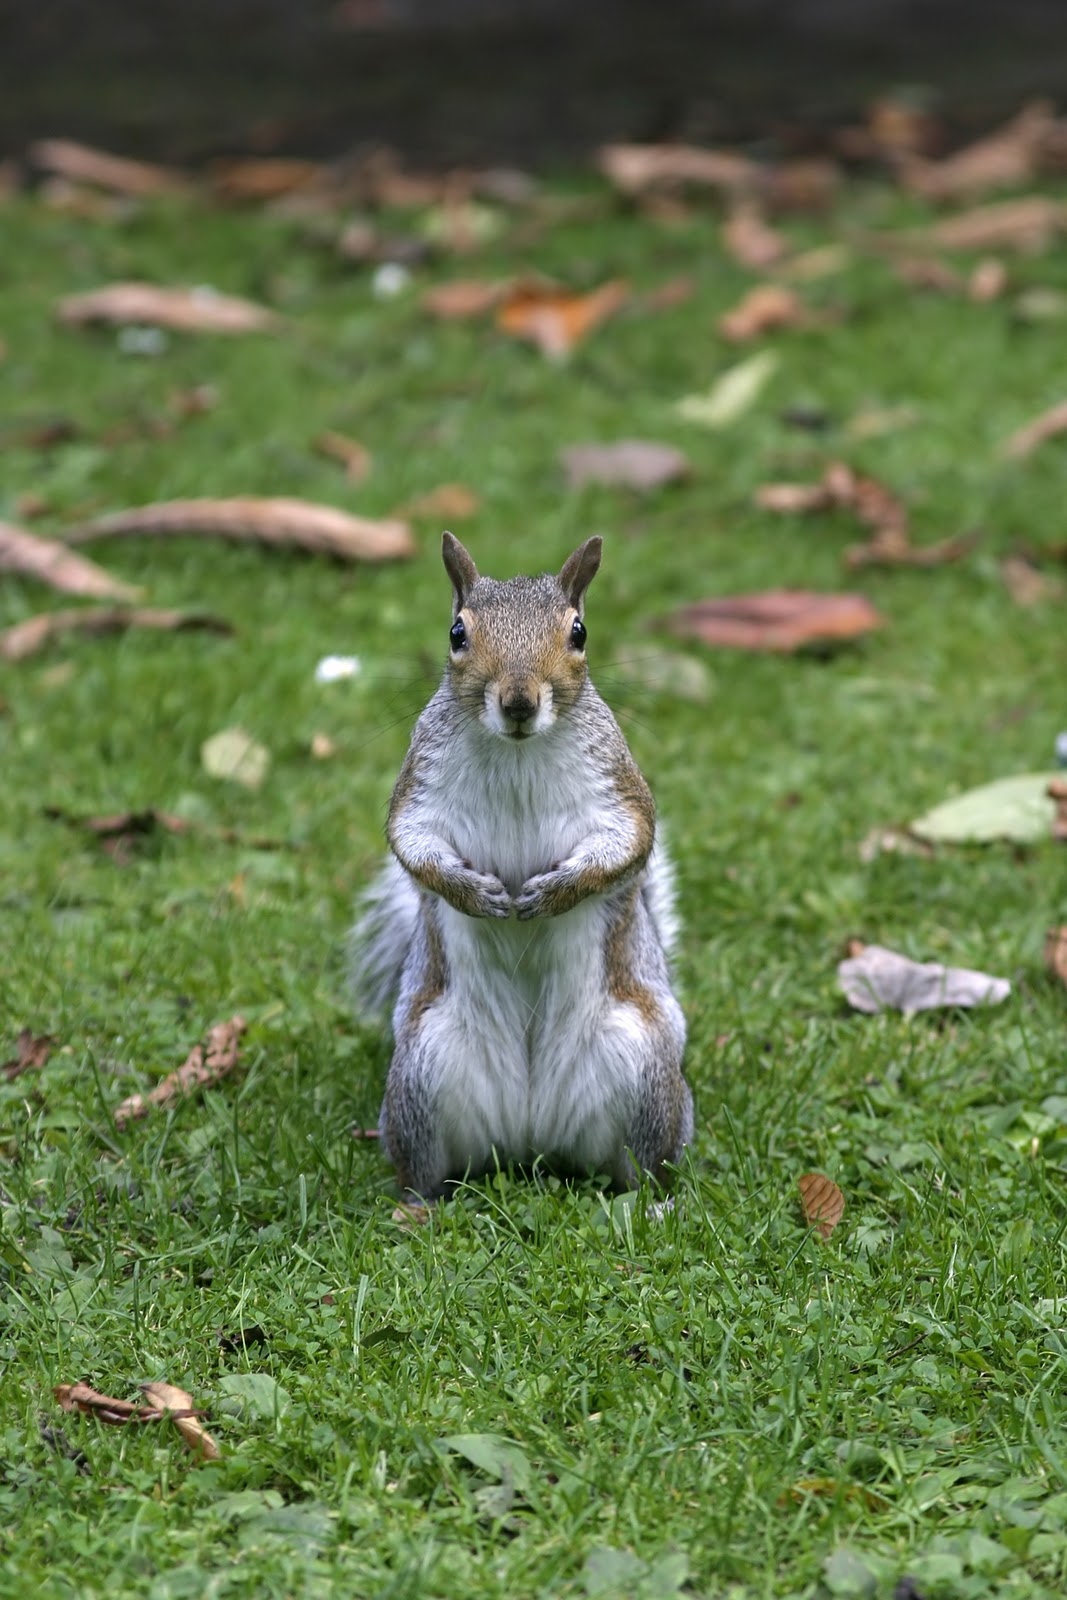
Weekly Tutorial - Army Squirrel
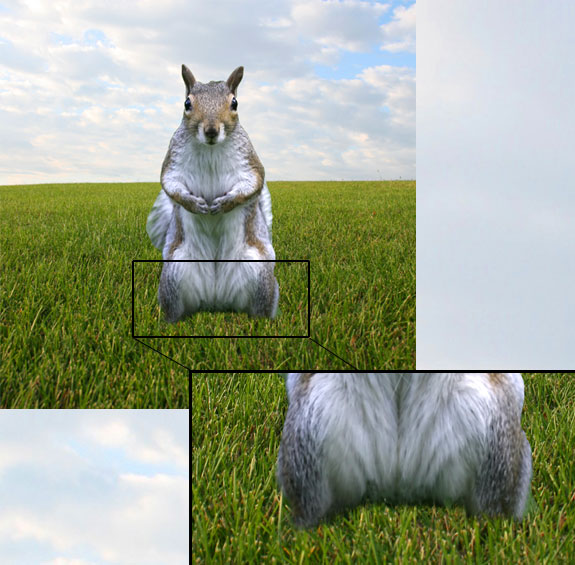
Final result preview

Step 1
Open the background image in Photoshop. You don’t even have to unlock it because you will not retouch it. Next, open the squirrel image and subtract it from the background with the Pen Tool (P). Paste the squirrel over the background and use a soft brush to blend it with the grass from the background layer.
Step 2
The next obvious step is to create the shadows casted by the squirrel. So create a new layer below the squirrel and paint some shadows underneath using a soft low opacity brush. I also painted some shadows over the lower parts of the squirrel’s body.

Step 3
Now you have to redo the fur on the squirrels body. Get the Smudge Tool set Strength to about 20% and a 40-50px soft brush and smudge the sharp edges. Then set the smudge brush to 1 or 2px set Strength to 80-90% and make the hairs of the squirrel.

Step 4
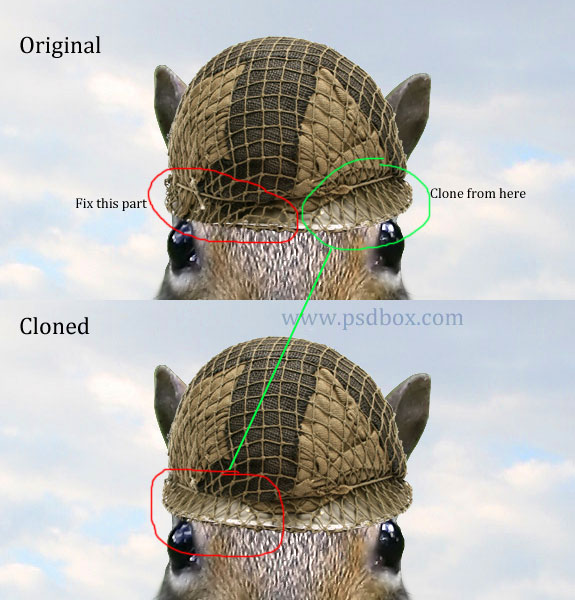
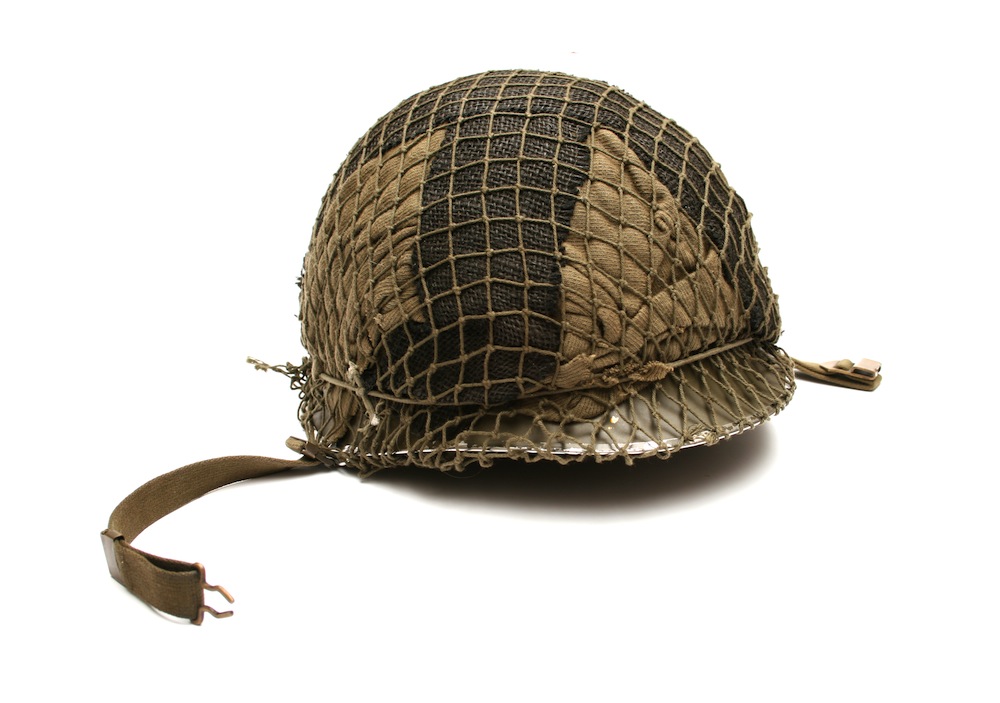
Open the helmet image in Photoshop (if you can’t open it try opening it in Paint and then save it as jpg and try opening it again in Photoshop.) Scale it down and place it over the squirrel’s head. In order to make the helmet more symmetric I cloned the right side. If you can’t clone it, copy the right side as shown below, paste it on the left side and blend the edges with a soft brush.
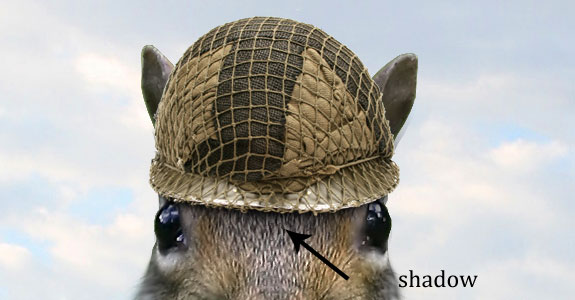
After that, create a shadow of the helmet on the squirrel’s head using a soft brush.
Step 5
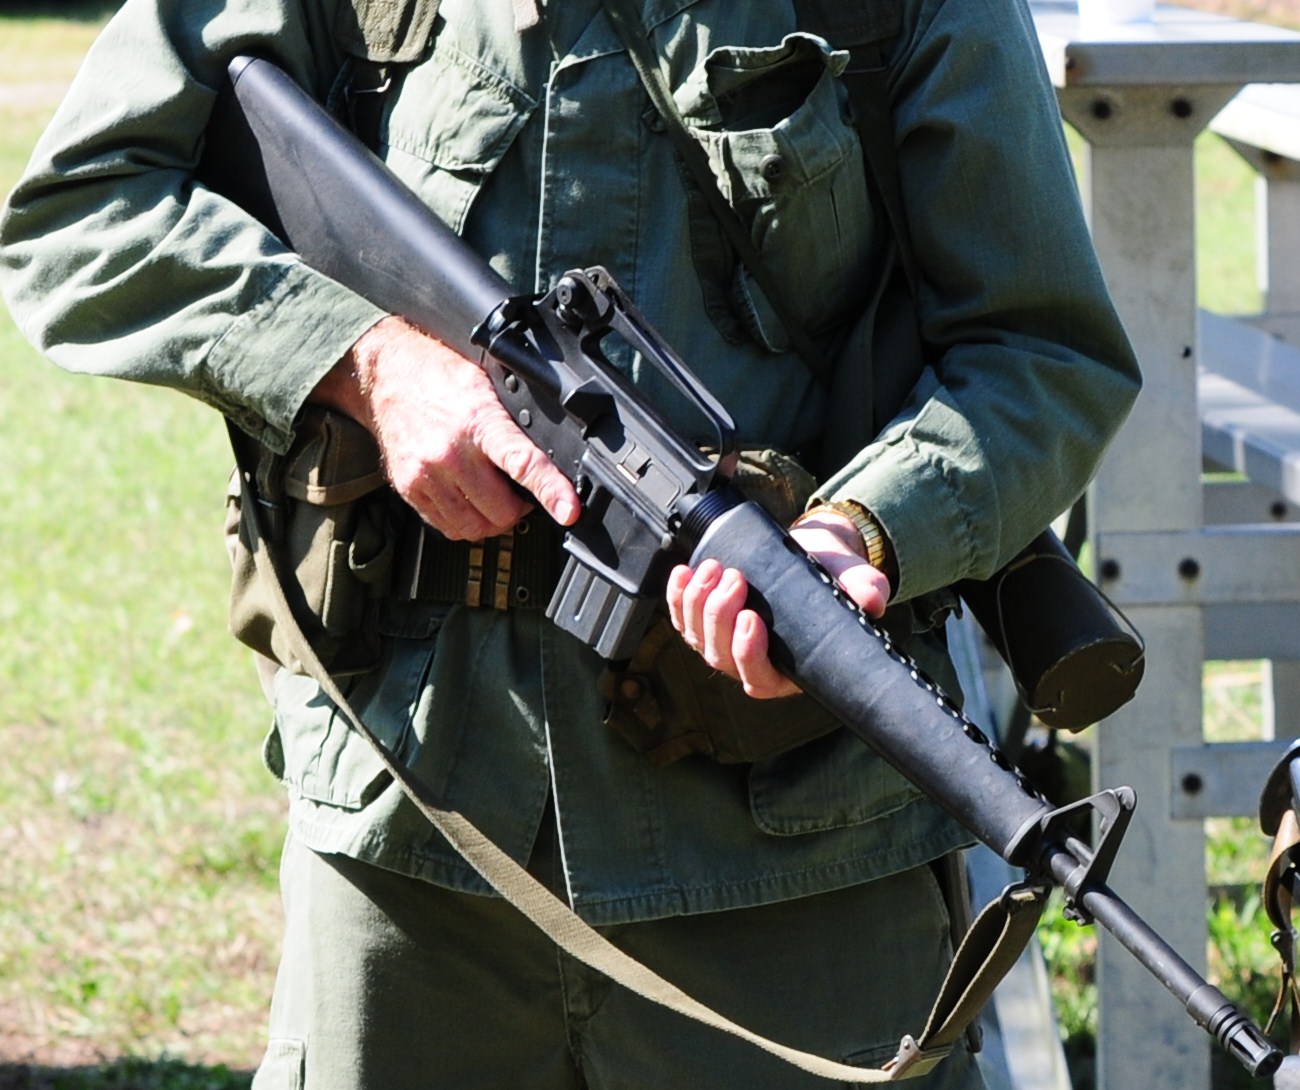
Open the gun stock image and start cutting with the Pen Tool (P).
Once you masked the parts of the soldier you don’t need, scale down and place the image so that the left hand of the soldier fits the squirrels left arm.
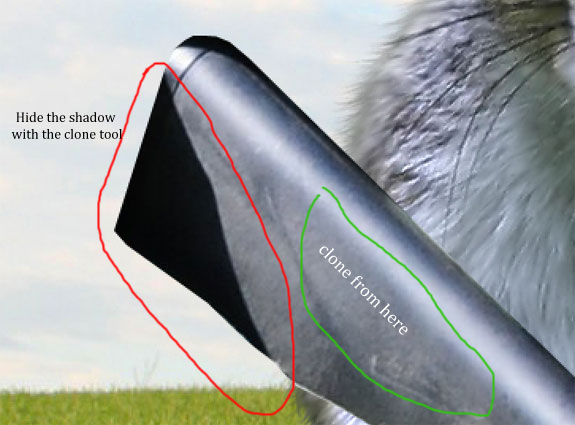
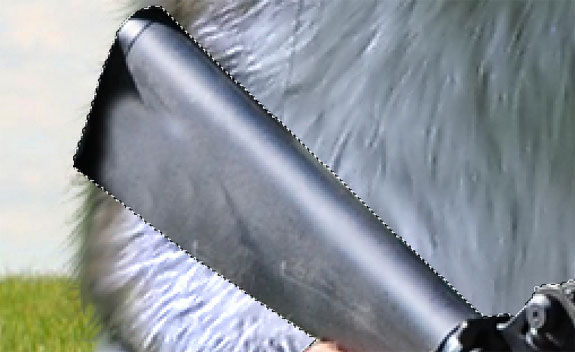
Step 6
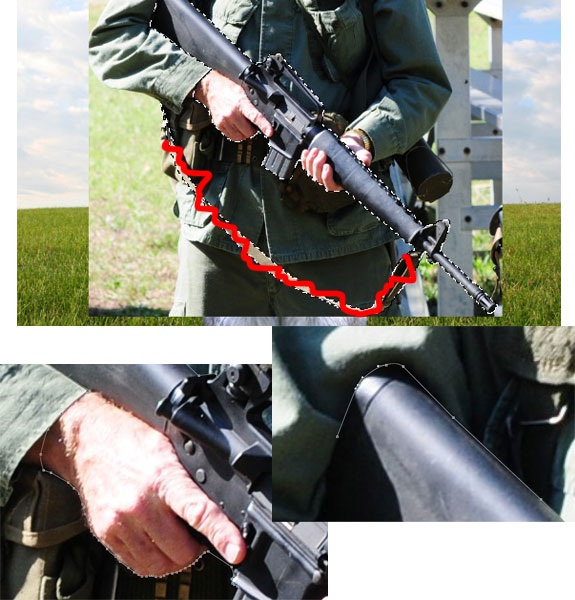
Next you will have to remove the shadow from the gun stock. Use the Clone Tool (S). See details on the images below.
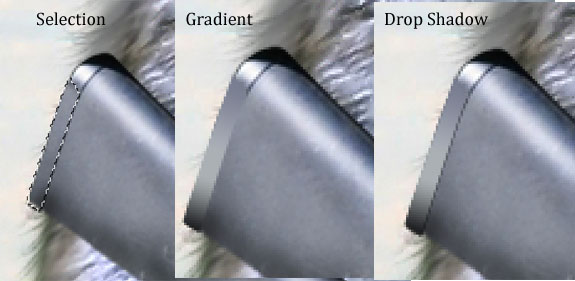
Step 7
Now you have to recreate the butt of the rifle. Make a selection with the Polygonal Lasso Tool (L) and then fill the selection with the Gradient Tool (G). As for the gradient colors I sampled them from the gun stock. After that add a 1 or 2 pixels Drop Shadow.
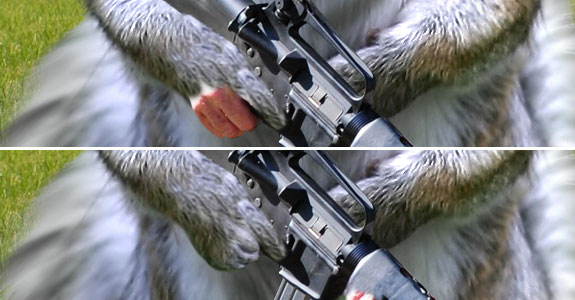
Step 8
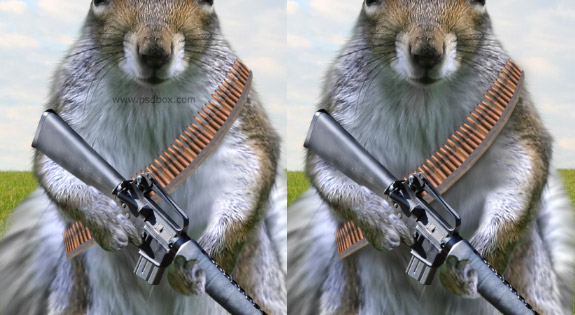
Let’s get to something more difficult now. You have put the squirre’ls hand on the gun. Start with the left hand. Use the Clone Tool (S) to sample hair from the squirrel’s arm and cover the soldier’s hand. If you activate the “All layers” option you will be able to clone the hair on an empty layer. I suggest you don’t clone the hair directly on the gun layer because it’s very easy to mess up here If you do, make sure you have a copy of it as backup.
After cloning the finger on the trigger, copy the squirrel’s left fingers and paste them over the remaining soldier hand. Use the Brush Tool (B) to blend it and the Warp Tool to adjust it. See image below.
Step 9
Now go to the right arm.Select and copy the squirrel’s right hand and paste it on a new layer as backup. Now on the original squirrel layer hide the right arm with the Clone Too. Again, I cloned on a separate layer.
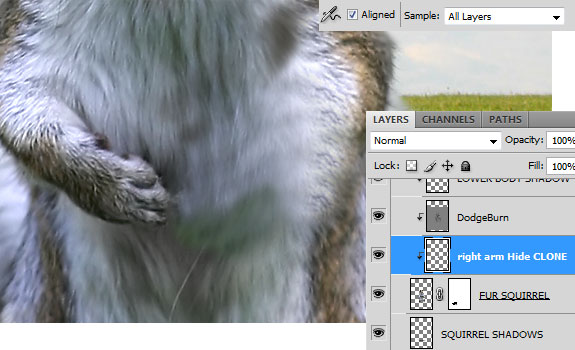
After hiding the arm, blend the copied arm using a Layer Mask and a soft brush. Rotate it so that it fits the soldier’s right hand fingers.
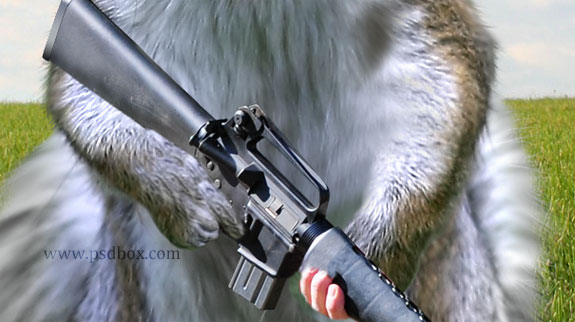
Step 10
The final step on this process is to cover the soldiers right hand fingers. Again, use the squirrels fingers and paste them over the soldier’s. Use the warp tool for adjustments and make it look as the squirrel is holding the gun.

Step 11
Now start making the ammo belt. Open the image with the bullets and delete the background using the Pen Tool (P) or any other technique you prefer. After that, duplicate the bullets and use the Clone Tool and Free Transform to position the duplicated bullets and “weld” them to the others. After fusing both ammo clips, duplicate then a few times and create a long strip like in the image below.
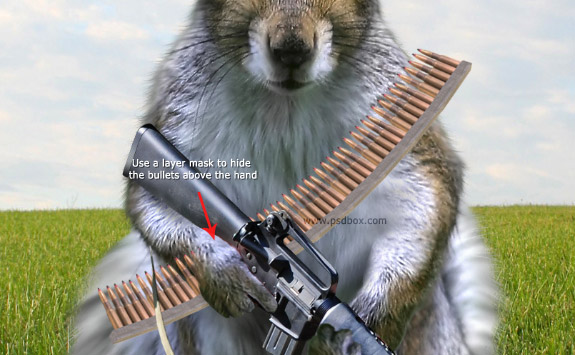
Step 12
Select the bullets layer and activate the Free Transform with Ctrl+T and select the Warp Tool. Adjust the ammo belt to create the illusion that it’s sitting around the squirrel’s body. Use Levels to increase the Midtones a bit. See Image below.

Step 13
Time for some Dodge & Burn because the manipulation is ready. Create a new layer above all layers on the palette and fill it with 50% gray from Edit>Fill or Shift+F5. Set the Blend Mode of the gray layer to Overlay and name it dodge-burn. Use the Burn and Dodge tool to enhance the shadows and highlights of the squirrel’s body and the gun. Also paint some shadows below the ammo belt on a separate layer.
Step 14
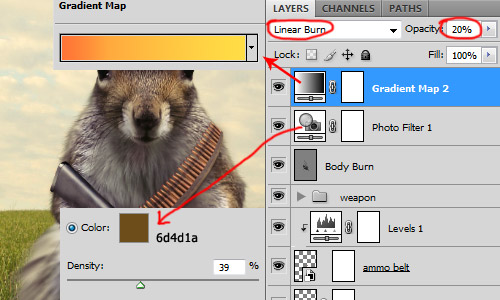
Time to make the final adjustments. Now you can turn this into something more interesting and more artistic tweaking the colors and lighting using some adjustment layers. Add a Photo Filter and a Gradient Map like in the image below.
Step 15
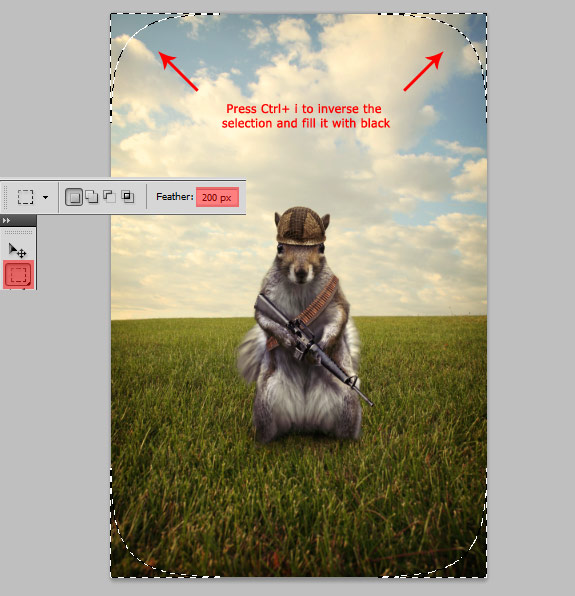
I also created a vignette effect. You can easily make it by selecting the Rectangular Marquee tool, set Feather to 150-200 px (smaller if you use a low res image) and drag to select the entire canvas (Ctrl+A will not work as the father will not be applied). After you make the selection invert it and fill it with black using the shortcut Alt+Backspace, change the layer blending mode to Soft Light.
Step 16
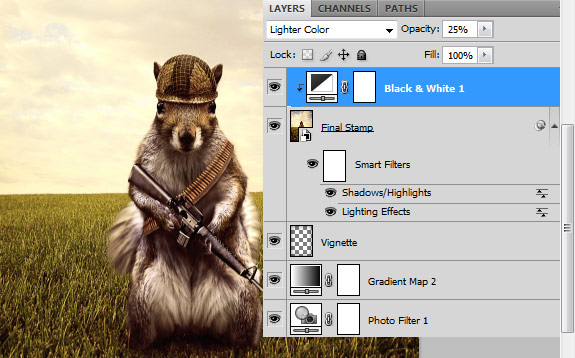
Next up I created a stamp with Shift+Ctrl+Alt+E and made more adjustments. I used the Lighting Effects from Filter>Render>Lighting Effects to focus the light on the squirrel. I also adjusted the Shadows/Highlights from Image>Adjustments>Shadows/Highlights and I increased the Midtone Contrast to 12 and decreased the Color Correction to -56.
The final touch is given by a Black & White adjustment layer set to Lighter Color and Opacity 25%.
I hope you learned something out of this tutorial. As you can see the Warp tool can be a really cool tool if used correctly.
Stock used
Squirrel: http://www.sxc.hu/photo/938803
Soldier helmet: http://www.sxc.hu/photo/670295
Weapon: http://www.sxc.hu/photo/946160
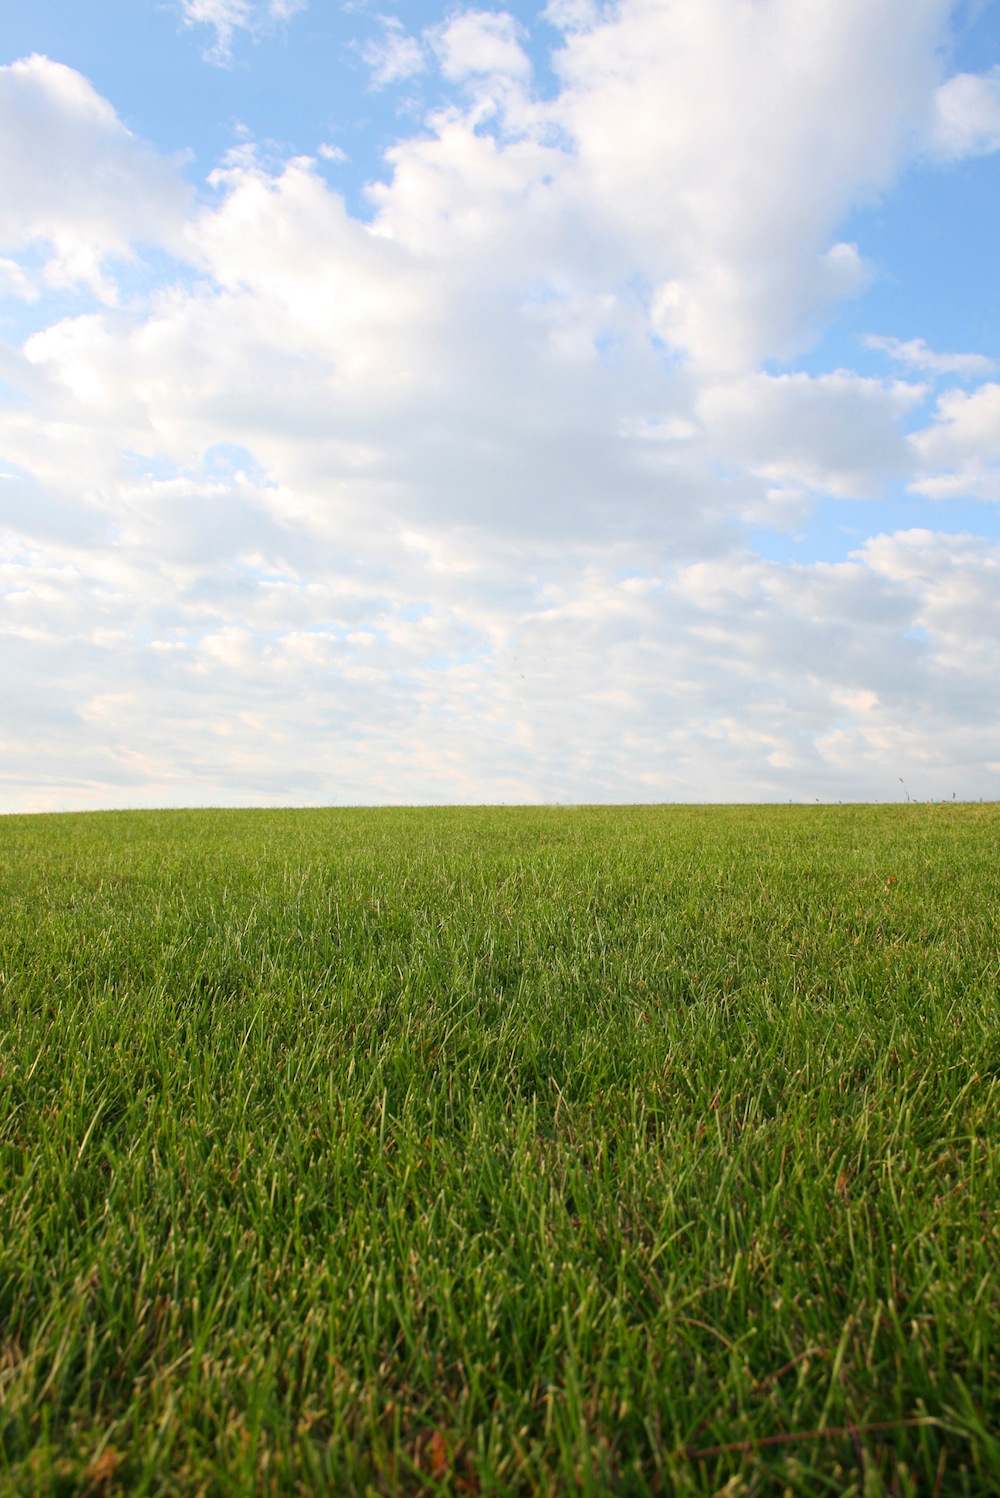
Background: http://www.sxc.hu/photo/1229342
Ammo: http://www.sxc.hu/photo/948158
Link to PDF file